GUIDE / CLASSROOM SETUP
How to set up a classroom projector in Malaysia
A classroom projector setup should be checked as a complete teaching environment: wall or screen, room light, image size, throw distance, viewing positions, source device, audio, power and cable safety. A short test using real lesson material is more useful than judging a bright demo reel, because learners need to read text and diagrams from different seats.
Published and reviewed 14 September 2026
KEY TAKEAWAYS
What should the reader carry into the decision?
- Test the projector at the intended image size and during the room's hardest normal light condition.
- Map the front corners, back row, teacher position and beam path before fixing projector placement.
- Use real lesson text, diagrams, motion and dark images instead of relying on a promotional reel.
- Record one working source path, one tested fallback and the exact adapter and cable used.
“Projector Brightness Depends on Ambient Light—Not Just Lumens.”
BenQ Malaysia
Method and scope. This room-first method was checked against the verified Neon+ V6 sheet and BenQ Malaysia's room-brightness guidance. It does not predict performance in an untested classroom or transfer V6 figures to another model.
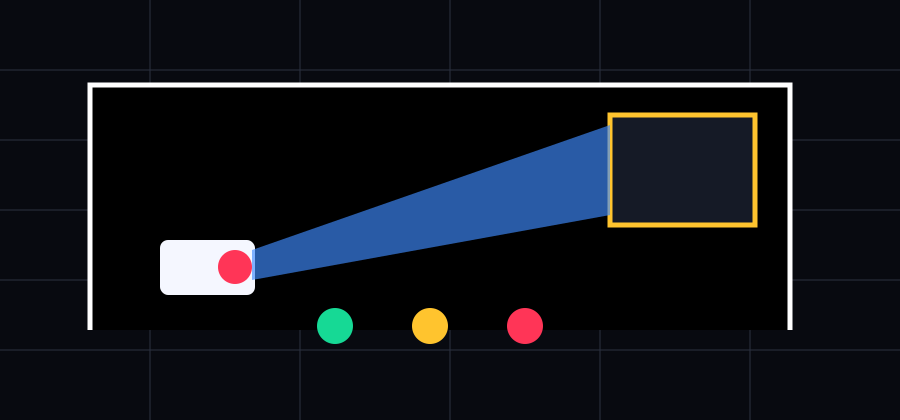
How should a classroom viewing zone be mapped?
Stand at the front and mark the image area that does not conflict with a whiteboard, noticeboard or doorway. Then sit in the front corners and the furthest likely seats. Check whether heads, furniture or the teacher’s usual position interrupt the beam. The chosen image size should remain readable without forcing the first row to look sharply upward.
Mark the front corner, back row and teacher position on a simple room sketch. Draw the beam path and note doors, fans and furniture. The result should show where a learner can read the full image and where a person could interrupt it during normal teaching.
Neon+'s current V6 page lists 600 ANSI lumens and 1280 × 800 native resolution. Source: Neon+ V6 product page →
- 01Front corner
- 02Back row
- 03Teacher position
- 04Clear beam path
Which room-light conditions should a projector test use?
Test with the same blinds, curtains and room lights used during an ordinary class. A completely dark room can flatter a projector while making note-taking inconvenient. BenQ Malaysia’s general guidance connects brightness with ambient light and image size, so record both when comparing results. If light varies during the day, include the more difficult period in the test.
Run the same test once in the morning, once during the brightest teaching period and once with normal room lights. Record image width with each observation. The result explains the light condition instead of reducing the decision to a lumen number alone.
The same V6 sheet gives a 39-inch projection frame at 1 metre. Source: Neon+ V6 product page →
How does throw ratio set projector distance?
The Neon+ V6 lists a 1.2:1 throw ratio. Treat that as a planning input: desired image width and throw ratio determine an approximate lens distance. Confirm the result physically because furniture, lens position and usable wall area can change the final setup. Leave airflow around the projector and avoid a position where learners can easily knock it.
The 1.2:1 calculation belongs only to the Neon+ V6. A 1.8 metre-wide image suggests about 2.16 metres of throw before lens position and clearance are checked. Another model needs its own verified ratio and a fresh physical test.
Neon+ states a 1.2:1 throw ratio for the V6. Source: Neon+ V6 product page →
- Image width
- Record the result
- Lens distance
- Record the result
- Stable surface
- Record the result
- Ventilation
- Record the result
How should a classroom source and fallback path be tested?
Decide whether the daily source is a laptop, phone, local media device or network connection. Test the exact adapter and cable length. If wireless casting is planned, test it on the classroom network with the devices teachers actually use. Keep a wired fallback available where lesson continuity matters, and confirm how sound reaches the room.
A dependable classroom path names a primary and fallback connection. For example: teacher laptop to HDMI through the approved adapter, with a tested spare cable nearby. If wireless casting is used, keep the network name and sign-in responsibility out of public setup notes.
The V6 page lists HDMI 2.0, two USB 2.0 ports and 2.4G plus 5G Wi-Fi. Source: Neon+ V6 product page →
Which lesson materials reveal projection problems?
Open a worksheet with small type, a slide with a dense diagram, a web page, a video with motion and a dark image. Walk to several seats and ask whether the information is legible. This test reveals scaling, focus, contrast and sightline issues that a colourful promotional clip can hide. Save the content set so future projector comparisons use the same evidence.
Save a five-item test pack: a small-print worksheet, labelled diagram, browser page, motion clip and dark image. Reuse it at the same image size from the same seats. This reveals focus, scaling, motion and contrast differences more reliably than unrelated demo reels.
Neon+ specifies two 5 W speakers for the V6. Source: Neon+ V6 product page →
- Small text
- Fine diagram
- Motion
- Dark scene
What belongs in a classroom projector handover record?
Write down the projector model, source device, adapter, cable route, image setting, preferred room-light state and shutdown routine. Photograph the cable connections for staff reference. A one-page record reduces repeated setup decisions and makes support easier because the team can describe the complete working configuration rather than only naming the projector.
The handover record should fit on one page and include model, source, adapter, input, image setting, light state, audio route, shutdown order and support contact. Store it where staff can find it without exposing passwords, student data or other confidential information. Add the date of the last successful test and the location of the spare cable so another teacher can reproduce the setup without changing its known working state.
The V6 sheet states 40 W consumption, 19 V / 3.42 A input and no built-in battery. Source: Neon+ V6 product page →
| Check | Status | Evidence |
|---|---|---|
| Model and source | Open | Attach current record |
| Cable and adapter | Open | Attach current record |
| Room setting | Open | Attach current record |
| Shutdown sequence | Open | Attach current record |
Carry the completed classroom record into the projector selection guide. →
QUICK ANSWERS
Frequently asked questions
What should a classroom projector test include?
Use the intended image size, ordinary room light, real lesson text and diagrams, the teachers' normal source device, the complete cable or wireless path, and views from the front corners and back row. Record the conditions so another model can be tested against the same classroom brief.
Should the classroom be completely dark for the test?
Test the lighting state teachers can sustain during ordinary lessons. A fully dark room may flatter the image while making note-taking or movement difficult. Include the brightest normal teaching period and record image width with the observation so the result has useful context.
What should be left for the next teacher?
Leave a one-page handover with the exact projector model, source device, adapter, input, image setting, light state, audio route, shutdown order, last successful test date, spare-cable location and support contact. Keep passwords and student information out of the public setup note.
Contact Neon+ with the completed room, model or support record →
See every guide in the insights index →
EXTERNAL CONTEXT
External sources explain category or evaluation context. They do not endorse Neon+ or prove its product capabilities.
NEXT MOVE
Turn the setup into a purchase check
Use the selection guide to compare specifications against the room record.
Open the selection guide